---
title: Adding Students and Creating Student Accounts
description: ReadTheory offers several ways to add students to your class, depending on whether they are new to the platform or already have an account.
---
[Skip to content](https://help.readtheory.org/adding-students-and-creating-student-accounts#main-content)
English
Show submenu for translations
[](https://readtheory.org/)
Open main navigation
Close main navigation
- English
Show submenu for translations
How can we help you?
- There are no suggestions because the search field is empty.
1. [ReadTheory Knowledge Base](https://help.readtheory.org/?hsLang=en)
2. [Getting Started](https://help.readtheory.org/getting-started?hsLang=en)
# Adding Students and Creating Student Accounts
## How to Add Students to Your Class and Create Accounts
ReadTheory offers a few different ways to add students to your class, depending on whether they're new to the platform or already have an account.
**Choosing the right option from the start helps prevent duplicate accounts**, which can cause students to lose access to their assignments and progress.
### 📑 Table of Contents
- [Choosing the Right Option for Your Class](https://help.readtheory.org/adding-students-and-creating-student-accounts#choose-right-option)
- [How to Get Started](https://help.readtheory.org/adding-students-and-creating-student-accounts#how-to-get-started)
- [Option 1: Select Existing Accounts](https://help.readtheory.org/adding-students-and-creating-student-accounts#option-1)
- [Option 2: Create New Accounts](https://help.readtheory.org/adding-students-and-creating-student-accounts#option-2)
- [Add Names (Unique Username and Password)](https://help.readtheory.org/adding-students-and-creating-student-accounts#add-names)
- [Create Accounts with Google Emails (SSO)](https://help.readtheory.org/adding-students-and-creating-student-accounts#Add-google-emails)
- [Import a File (Unique Username/Password and SSO)](https://help.readtheory.org/adding-students-and-creating-student-accounts#bulk-roster)
- [Option 3: Invite with a Class Code](https://help.readtheory.org/adding-students-and-creating-student-accounts#option-3)
- [Troubleshooting](https://help.readtheory.org/adding-students-and-creating-student-accounts#troubleshoot)
- [Related Articles & Resources](https://help.readtheory.org/adding-students-and-creating-student-accounts#related)
---
### Choosing the Right Option for Your Class
Start by deciding how you want your students to sign in.
| **How do you want students to sign in?** | **Best option** |
| --- | --- |
| Unique username and password (students don't have email addresses, or you'd rather not link one to them) | Option 2: Create New Accounts |
| Single Sign-On, with Google, Microsoft, Clever, or ClassLink | Option 3: Invite with a Class Code ***-OR-*** Bulk Create New Accounts (for single sign on) under Option 2: Create New Accounts |
---
### How to Get Started
1. Select the class you'd like to add students to.
2. Select **Add Students** at the top of the page.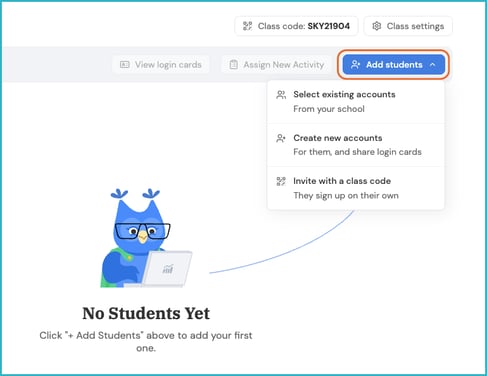
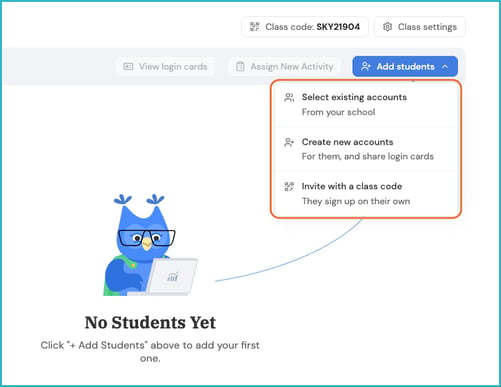
3. Choose one of three options:
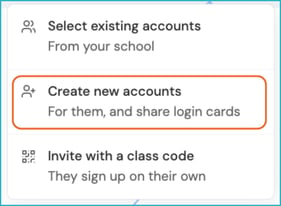
1. #### **Select existing accounts**
2. #### **Create new accounts**
3. #### **Invite with a class code**.
---
### Option 1: Select Existing Accounts
**⭐Best for:** students **already enrolled in one of your other classes**, or students who are part of a **premium school plan**.
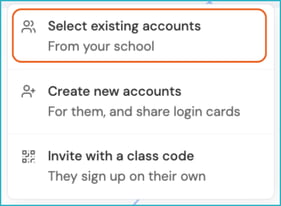
1. Search for and select the students you'd like to add to this class. 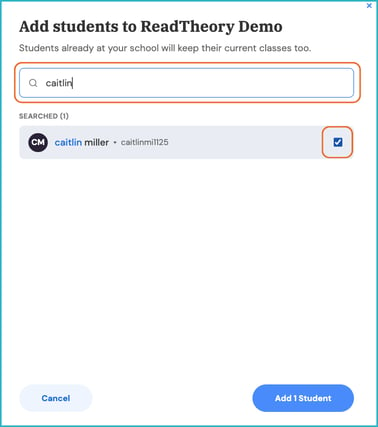
2. Once you've selected everyone you want to add, select **Add Students**. 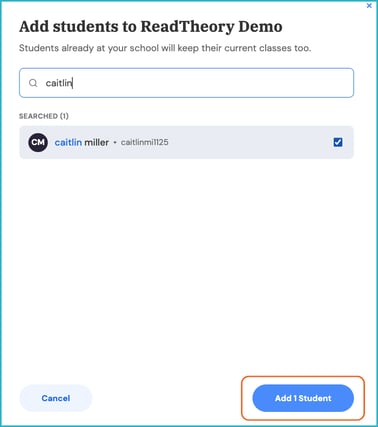
---
### Option 2: Create New Accounts
**⭐ Best for:** students who will sign in with a **unique username and password**. This option also supports SSO accounts through the bulk CSV upload below.
#### **Add Names (Unique Username and Password):**
**⭐ Best for:** students who will sign in with a unique username and password.

1. Type the student's first name and last name (or initial). 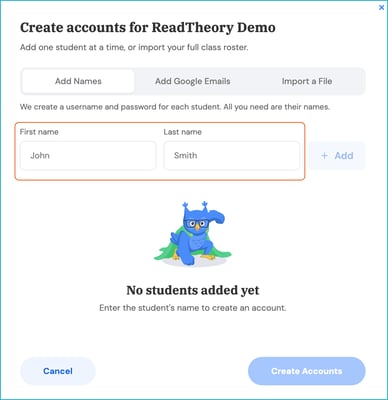
2. Select **Add** after typing in each student's name. Repeat until you have added all of your students.
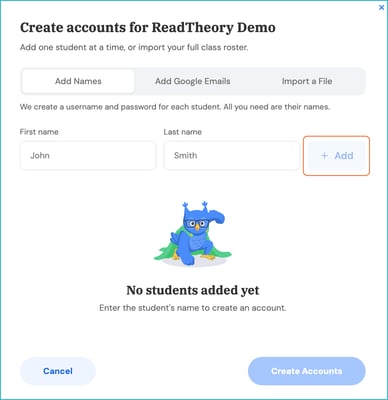
3. Once all students are added, select **Create Accounts** at the bottom of the page. 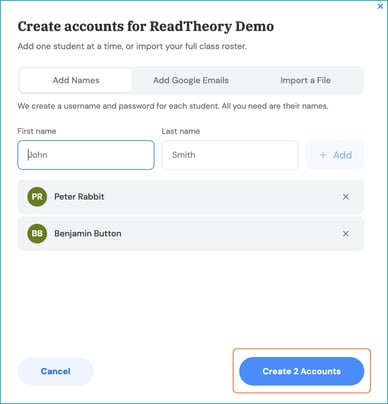
#### **Add Google Emails (SSO with Google email):**
**⭐ Best for:** students who will sign in with their Google email address ("Sign in with Google")

1. Type the student's full Google email address. 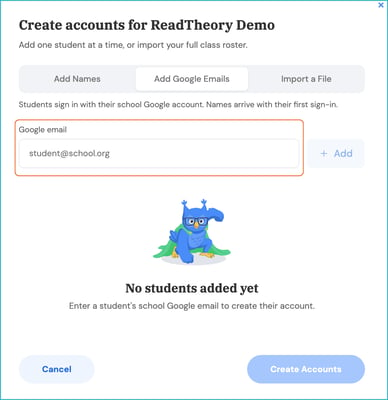
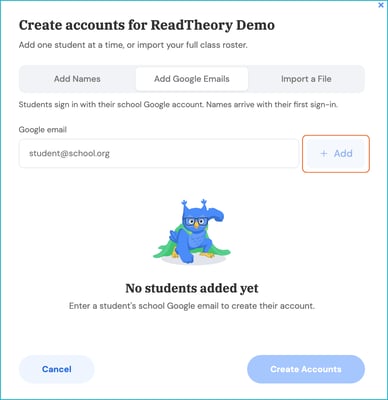
2. Select **Add** for each student after their Google email address. Repeat until you have added all of your students.
3. Once all students are added, select **Create Accounts** at the bottom of the page. 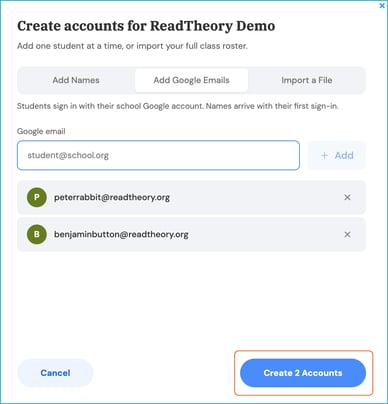
🔒Student credentials are not emailed to you, but they're viewable on the platform.
From the class page, select **View Login Cards** to see them; this is how students will sign in. You can print login cards for students and regenerate them if needed. See [Student Login Cards](https://help.readtheory.org/student-login-cards?hsLang=en) for more information.
### **Import a File: Bulk Create New Accounts**
**Best for:** adding 30+ students to a class. This option allows you to bulk create accounts for students to sign in with a unique username and password or Single Sign-On with Google or Microsoft emails.

Select **Import a File**, then select **Download Example CSV**. 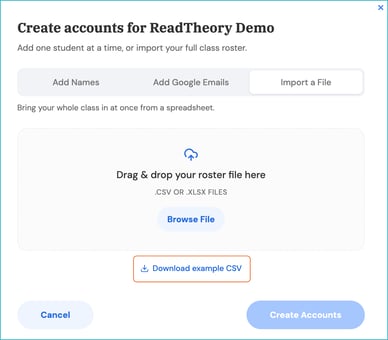
**Fill out the downloaded template (be sure to erase the present sample materials).**
#### **For unique username and password accounts:**
1. On the downloaded CSV document, enter the student's first and last name. 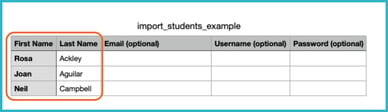
2. Leave the other fields blank. The platform will generate a username and password for each student.
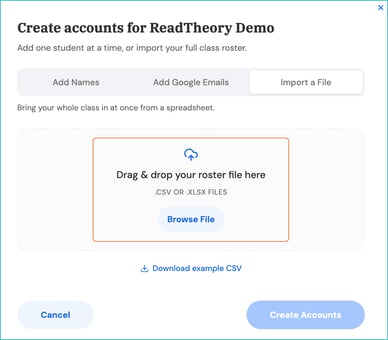
3. Import the completed CSV where it says **Drag & drop your roster file here** (Make sure it is saved as a CSV or XLSX file).
4. Review the list, and if everything looks correct, select **Create Accounts**. 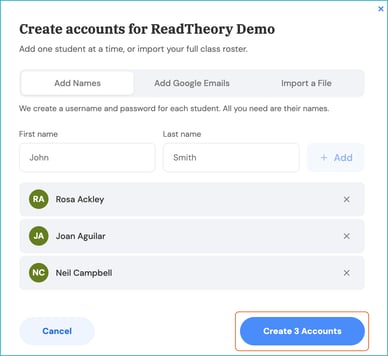
#### **For Single Sign-On accounts (Google, Microsoft):**
1. On the downloaded CSV document, enter the student's first name and last name. 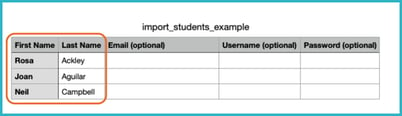
2. Enter the student's Google/Microsoft email address as the username. 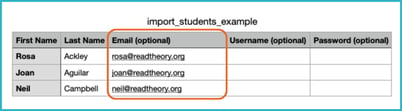
3. Enter the same email address in the email field. 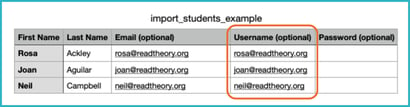
4. Make sure the **username and email match exactly;** that's what makes the account SSO-ready.
5. You can leave the password field blank. The platform will generate a password for students.
6. Import the completed CSV where it says **Drag & drop your roster file here** (Make sure it is saved as a CSV or XLSX file).

7. Review the list, and if everything looks correct, select **Create Accounts**. 
🔒Once student accounts are created, you can view login credentials on the platform.
From the class page, select **View Login Cards** to see them; this is how students will sign in. You can print login cards for students and regenerate them if needed. See [Student Login Cards](https://help.readtheory.org/student-login-cards?hsLang=en) for more information.
---
### Option 3: Invite with a Class Code
**Best for:** teachers who want students to sign in with Single Sign-On and have students who can follow instructions to create their own account.
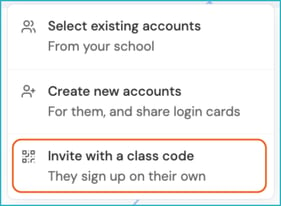
1. Select **Invite with a Class Code** and share the provided link or QR code with your students.
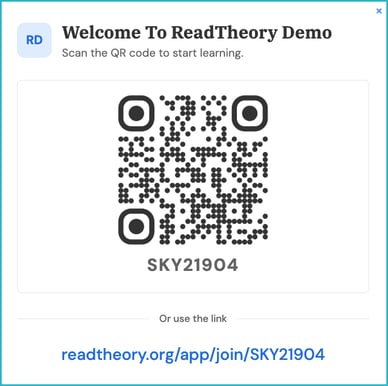
2. Students follow the link and select **Sign up with Google, Microsoft, Clever, or ClassLink** (whichever provider your school uses).
3. Students follow the prompts to create their account.
⚠️ **Important:** Students must use the specific link you shared to be linked to your class. If a student creates an account on their own, not through that link, it will not be connected to your class. They can still join afterward using the class code method in [How to Connect to a Teacher through Class Code](https://help.readtheory.org/connecting-to-teachers-class-code?hsLang=en).
---
### Troubleshooting
**Seeing a "username taken" or "username already exists" error?**
This typically means the student already has a ReadTheory account. Check out our troubleshooting guide for help: [Username Taken or Already Exists Error](https://help.readtheory.org/troubleshooting-username-taken-or-username-already-exists-error-message?hsLang=en)
**Student Created Own Account NOT with Class Code Link?**
If a student creates an account on their own, not through that link, it will not be connected to your class. They can still join afterward using the class code method in [How to Connect to a Teacher through Class Code](https://help.readtheory.org/connecting-to-teachers-class-code?hsLang=en).
---
### Related Articles & Resources
[Student Login Cards](https://help.readtheory.org/student-login-cards?hsLang=en)
[How to Connect to a Teacher through Class Code](https://help.readtheory.org/connecting-to-teachers-class-code?hsLang=en)
[Creating Classrooms](https://help.readtheory.org/creating-classrooms?hsLang=en)
[Single Sign On Options](https://help.readtheory.org/single-sign-on-options?hsLang=en)
[Troubleshooting Duplicate Student Account](https://help.readtheory.org/troubleshooting-duplicate-student-accounts?hsLang=en)
---
Have questions? We're here to help. Reach out anytime at [support@readtheory.org](mailto:support@readtheory.org).
- [Getting Started](https://help.readtheory.org/getting-started?hsLang=en)
- [Using ReadTheory](https://help.readtheory.org/using-readtheory?hsLang=en)
- [Account & Access](https://help.readtheory.org/account-access?hsLang=en)
- [Premium, Billing & Subscriptions](https://help.readtheory.org/premium-billing-subscriptions?hsLang=en)
- [Troubleshooting](https://help.readtheory.org/troubleshooting?hsLang=en)
- [FAQs](https://help.readtheory.org/faqs?hsLang=en)
- [Reporting & Benchmarks](https://help.readtheory.org/reporting-benchmarks?hsLang=en)
[](https://readtheory.org/)
Copyright © 2026, ReadTheory LP